Saturday, October 23, 2010

Plethora of Pears

This fall, we had an over abundance of pears. We literally couldn't give them away fast enough or think of enough uses for them. Many sadly went to waste. Well, not complete waste. They went to the compost heap to be later reintroduced back into the earth.
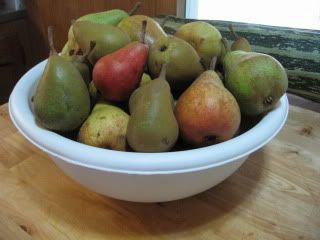
I was craving cupcakes desperately bad a few weeks back. I'd been looking at this massive bowl of pears racking my brain for some way to use them that would not involve canning. Not only do I not have the containers for canning, I'm lazy.

It finally hit... Pear Spice Cupcakes. My mom used to make spice cake when I was a kid. It was one of the few times she would work in the kitchen without something going terribly awry. You know it's true, Mom, so minimize those protests. How do you make mashed potatoes again?

Whoops, that's not the trail we want. Where was I?

Ah, yes. Surely it would not be that difficult to manipulate a spice cake recipe to get a delightful pear flavor I was looking for. I did this recipe as cupcakes, but you can just as easily do this up as a full fledged Autumnal Tribute cake.
~~~~~~~~~~~~~~~~~~~~~~~~~~~~~~~~~~~~~~~~~~~~~~~~~~~~~~~~~~
Pear Spice Cupcakes
1-1/2 Cups Pureed Pear (approximately 3-4 average size pears)
1/2 Cup of Butter
2-1/2 Cups of Purpose Flour
1-1/2 Cups of  Sugar
2 Eggs
1/4 teaspoon Baking Powder
1-1/2 teaspoon Baking Soda
1-1/2 teaspoon Salt
1 teaspoon Cinnamon
1/2 Cup of Water
A couple shakes each of ground nutmeg, ground cloves, and ground ginger

I started off with peeling the pears before cutting them lengthwise. I've seen suggestions to use a melon baller to remove the core and seeds, but I have metal measuring spoons that work this just fine in the same way. I then quartered the pears and tossed them in the blender for pureeing, until there were no chunks.
In my Kitchen Aid stand mixer, I creamed the butter and sugar together. In a seperate bowl add your dry ingredients and mix them together well. Mix the eggs in with the sugar. Gradually add the water and pureed pear to the sugar mixture until thouroughly mixed. Then gradually add the flour mixture to the mixer until all the ingredients have come together.
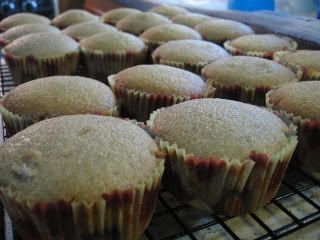
Fill muffin cupcake liners in cupcake pan 2/3 of the way with the cake batter. Bake for approxiametly 18-20 minutes in an oven pre-heated to 340 degrees fahrenheit. Makes about 24 cupcakes. Allow to cool before frosting.

~~~~~~~~~~~~~~~~~~~~~~~~~~~~~~~~~~~~~~~~~~~~~~~~~~~~~~~~~
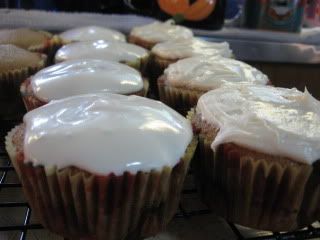
*Note: Cupcakes imaged above were not frosted with this icing, but I have since determined this to be a far superior compliment than regular cream cheese frosting.
Maple Cream Cheese Frosting
1 Cup of Butter, softened
3 Ounces of  Cream Cheese, softned
2/3 Cup of Brown Sugar
1/4 teaspoon Salt
3/4 Cup of Maple Syrup (preferably real)
3/4 teaspoon of Vanilla Extract
1 Cup of Powdered Sugar
In a stand mixer beat sugar, butter, cream cheese, and salt together until fluffy. Gradually add the maple syrup and vanilla extract. Slowly add the powdered sugar until fully intgrated and fluffy.
Frost to your heart's content.

Thursday, September 16, 2010

Pizza Loaf

I follow a lot of blogs. Sometimes it gets overwhelming. Then it gets even worse when I click and click and click right onto more blogs! And my blog list gets even longer.I don't even remember which blog I was on when I stumbled upon a link for this recipe. I feel kind of bad about that, because I'm sure it's a really awesome blog. I probably wouldn't follow it if it weren't, right?

This recipe won the 2010 King Arthur Flour National Festival of Breads. So I figured it must be yummy. It is. I really wanted to try it, but I needed something for dinner. So I changed the filling, and it was still delicious. :)

Using my Kitchen Aid stand mixer, I followed the dough recipe.
Photobucket

After halving the dough, I rolled it out. This was a huge hassle, because this stuff is springy. J said there was something I could have done that would have made it less springy... but I forget what it was now. More kneading? More resting? Combo roundhouse throat punch?
Photobucket

And then I had to take a picture of the Potato rocking a zucchini to sleep.
Photobucket

We still had the ingredients from making pizza couple days before. Unfortunately, we were still out of tomato sauce. So, I made my own. I washed about 12 cherry tomatoes from the garden. On the bottom of each tomato I scored an X with a kitchen knife. In small batches and using a spider strainer, I placed the tomatoes in boiling water for about 10 to 15 seconds. With the tomatoes still in the spider, I placed to tomatoes under cold running water for about 20-30 seconds. You can have a bowl of ice water to move the tomatoes to if you prefer. Now that my tomatoes were blanched, the skins were easy to pull away. If any give you trouble, just dunk them again.
Photobucket

I diced some orange bell pepper, onions, and garlic to add to my sauce.
Photobucket

After emptying the pot of boiling water and lowering the temperature on the stove, I added my diced tomatoes and other veggies to the pot. I seasoned the vegetables with salt, pepper, oregano, sage, basil, and balsamic vinegar. After allowing it all to simmer for a little while, maybe 10 or 15 minutes, I used my stick blender to puree it all into something a bit more sauce like. This amount of sauce was enough for the one half of dough I was using. So, if you are using all of the dough or you like a heavy amount of sauce, use more than twelve cherry tomatoes. I'm terrible at measuring for recipes like this, so go with what feels right. You'll learn. ;)

While my sauce was simmering, I cooked up some sausage and some bacon. For some reason, when I cook bacon, it always ends up a little burnt. No matter what. It's like the lawn mower beginning to smoke. It just happens.
Photobucket

Returning to my rolled out dough, I layered on the tomato sauce and some mozzarella cheese.
Photobucket

Then the sausage, bacon, and tomatoes. I meant to add pepperoni, but I forgot since it got moved about to keep a certain toddler from scarfing it down.
Photobucket

Beginning with the edge furthest from me, I began to roll the dough lengthwise.
Photobucket

Photobucket

Using the edge of the dough, I pinched the roll together to make a seam to keep it together.
Photobucket

And rolled it over, seam side down.
Photobucket

With a pair of kitchen shears, begin cutting lengthwise starting from about a half inch from the end. You want to cut about one inch deep, as well. Mine didn't turn out as pretty as the recipe I was following partially because I did not cut deep enough.
Photobucket

The roll will fall apart, and that's okay. You can fix that after you finish cutting.
Photobucket

Now, taking each end of your roll, place them on alternate sides at the middle of the roll.
Photobucket

Underneath the middle of your roll, pinch the two ends together.
Photobucket
Photobucket

Let me take a step back. I would suggest that you move your roll to the baking surface before shaping it into the figure eight. It will be easier to move. Actually, maybe even move it before you cut it.
I used a large round baking stone. Let it sit and rise for about 45minutes.
Photobucket

While you are waiting for your loaf to rise, turn the oven to 350 degrees Fahrenheit. Once your loaf has risen, place it in the oven for about 15-20 minutes.
Photobucket

When your timer goes off, tent a piece of foil over your loaf in the oven. This will prevent over browning. I recommend sizing up your sheet of foil before placing the dough in the oven. Bake for another 15-20 minutes before removing your delightful concoction from the oven. If you are making both halves of dough, place the finished loaf on a cooling rack and begin baking the second one.
Photobucket

After your loaf has cooled for 10-15 minutes, slice and serve. My kids loved this for dinner. So did J. The next morning, J sliced some of the leftover bread, added more cheese and baked until the cheese was melted. Very nummy breakfast.
Photobucket

Obviously, I used a filling a bit different than the original recipe. I highly recommend experimenting with all kinds of combinations.

Wednesday, July 28, 2010

The Truffle Trials

Last week I decided I was sick of craving cheesecake truffles. I also decided I was Not driving to Seattle, fighting for a parking space, paying for said parking space, and walking in search of delightful Cheesecake Truffles from The Confectional at a few bucks a pop in my mouth.

After searching the web for some recipes and tips, I gave up unsatisfied with what I was finding in cop out faux cheesecake recipes. Deciding this was going to have to be an experimental project, I checked my several cookbooks for a recipe I was willing to use that seemed friendly.

Photobucket
This photo is not of the whole cheesecake, because after it sat in the fridge, I of course had to test taste a slice. It was fabulous.
Oh yes. I did not use a spring-form pan. A) I don't have one. B) They are worthless uni-tasker that leak. No thank you. I actually used some flour based baking spray, and the cheesecake comes out delightfully fine, without trouble. A certain TV chef that my boyfriend is a HUGE fan of recommends lining a round cake pan with parchment paper. I'm lazier than that.

I did not bother making a crust for this cheesecake since I was not going to be eating it in the traditional manner. After attempting to shape a truffle from the chilled concoction, I decided it would be best to freeze it overnight. That was much easier, but the stuff warms fast. I highly recommend that your wear latex gloves, Powder Free, as this gets messy.
Photobucket
These tasty little treats then went back into the freezer to firm up again for the next step. About an hour or so.

I then melted milk chocolate candy coating in a bowl, over a pot of simmering water. I also melted a bowl of vanilla candy coating. I then rolled each truffle in the coating of my choosing, one at a time, using a spoon to help coat. Then I moved the truffle to a bit of wax paper I had waiting on the side and allowed the candy coating to harden over the truffle. If you so choose, you should add your desired flourish of a chocolate chip or candy while the coating is still soft.
Photobucket
I of course subjected my boyfriend and his father to awful task of guinea pig duty. Oh, the poor dears....

A word of caution. Here in western Washington, it is quite humid. When we get scorching hot days, like the day I was doing these truffles, it's still very humid. I found out quickly that high humidity in the air will quickly seize your melted chocolate. In fact, here's a small demonstration of what I mean.
Photobucket

~~~~~~~~~~~~~~~~~~~~~~~~~~~~~~~~~~~~
Okay, the recipe I used... (Ahem, courtesy of Alton Brown, the aforementioned TV chef.)

Sour Cream Cheesecake
12Servings

*Note: I am going to give you the recipe as written in the book that I used, but just the filling. If you are somebody who might be holding a truly American ideal and have some insane desire to sue me for posting this, just shoot me a message, and I'll remove it. Don't get your panties in a bunch.*

Food Network Recipe--------The Book
20oz Cream Cheese---------24oz Cream Cheese (room temp)
1 1/4 cups sour cream---------10 1/2oz sour cream (room temp)
1 cup Sugar--------8oz Sugar
1Tblspn Vanilla-------1Tblspn Vanilla
2 eggs--------2 eggs
3 egg yolks----------3 egg yolks
1/3 cup heavy cream---------1/3 cup heavy cream

Preheat oven to 250F degrees. (Unless you are doing this in a crust, 300F for baking the crust before hand, and dropping to 250F before baking cheesecake.)

-Bring 2qts water to a boil.
-Combine vanilla, eggs, yolks, and cream in a small bowl and set aside.
-Using a stand mixer with paddle attachment , beat the cream cheese with the sugar for 1 minute on low speed. Scrape down the bowl, add the sour cream, and mix on low for 30seconds. Scrape the bowl again, boost the speed to medium, and beat until lump free. About 2 to 3 minutes.
-With mixer running, slowly pour in the egg mixture, stopping every now and then to scrape down the bowl. When the mixture is homogeneous (Do you know your 8th grade science terms? AB's editors don't know the difference with it between homogenous.), pour the filling into the cooled crust. (Or, if you're making truffles, into a prepared pan.)
-Center a roasting pan in the oven and line it with a kitchen towel. (AB says this is to help slow the march of heat into the bottom of the pan.) Place the cheesecake in the middle of the pan and add the boiling water to 1.5 inches up the side of the pan.
-Bake for 2 hours, then kill the heat. (Turn off the oven. I know you're smart.) Open the oven door for 1 minute, then close it and leave it closed for 1.5hrs. (With the cheesecake still inside, folks.)
-Remove the cheesecake from the water bath and refrigerate for 6 hours before serving. Let the water bath cool completely before removing from oven. (Read: Remove cheesecake while roasting pan is still on oven rack. Otherwise, you are going to splash water onto your lovely cheesecake, or yourself.)
~~~~~~~~~~~~~~~~~~~~~~~~~~~~~~~~~~~~~~~~~~~~~~~

Now then, just follow my steps as listed above in the area I posted pictures, and you too can have delicious waist expanding confections of awesome!


Sunday, July 25, 2010

Advancements in Technology

After a brief news update on the radio while driving about....

J: Wow. 93?

Me: What?

J: Zsa Zsa Gabor. She's 93.

Me: Oh, yeah. Wait. Was that just saying she died?

J: No, she's still in critical condition. But she squeezed her husband's hand and can say his name.

Me: Oh. Okay. She had a stroke during a hip replacement surgery after breaking her hip preparing to answer the phone.

J: What does that say when you have to prepare to answer the phone?

Me: Well, she was in bed and trying to get to her wheel chair. But somebody left the brake off, and it rolled away from her.

J: Her wheel chair?

Me: Yeah. She's paralyzed from a car accident several years ago or something. I don't know why they didn't just have a phone set up right next to the bed.

J: Just goes to show all the money in the world, and you still won't live forever.

Me: All the money in the world, and it still won't buy you a fully functioning body.

J: Yeah. Except for Cher. But she's a robot.

Tuesday, July 20, 2010

Because, Sometimes More is Better

That's how I feel about adding another blog to write. So often, I feel there are things I might like to blog, but then feel they just don't fit in so well at Daily Disorders of Dainty Domestic. That blog is kind of my fluffy bunny sunshine blog. Well, not always. But, it's definitely my family oriented blog. So, this blog will be more for the weird random stuff that floats about in my brain all day long. I may also rant about things incredibly minor. Remember? Dainty and psychotic.

Let's start things off right. In this house, Pepsi is god.
Photobucket
No, wait. Pepsi is goddess. Coffee is god.
Photobucket
And these are their altars.
Photobucket
Photobucket
Though, I'm sure if you asked my youngest, she would say Milk is god. It's like her coffee.
Photobucket
Okay, I suppose if you asked my boyfriend, the Christian God is god. But don't let him fool you. He's just as hung up about soda and coffee as I am. I'll worship the

life

sanity sustaining liquid.

Also, this is the way to eat a baked potato. If I have to eat the potato skin for the vitamins, I am not wasting time sawing through it with a fork. Eff that. I already had to work to make it just as I like. I am not wasting energy to eat it. This is America.
Photobucket

I hate spiders. They are evil. They are the bane to my existence. Every time you kill one, there is another seeking to avenge it's death. I'm not kidding. I keep vacuuming the same bloody corner in my house, and every time a spider of the exact same type takes up residence there.
See? That corner. Right there. Every effing time. Not two feet away from my favorite place to sit in the living room. I took that photo not 10minutes ago. He'll be getting sucked up right after 8pm, so I can freak out if he escapes, without traumatizing my toddler.
Photobucket
Photobucket
They attack me when I sweep, too. Effers. Don't give me any of that, "Oh but they eat the harmful insects." They can eat them outside. If the insects come inside, they are getting killed just like the arachnids. Evil, disturbing, freaks making a mess of my house with their webbies left behind after they move to another corner.

I have to end this with something fluffy to distract from uggies. Baby Chickadees!
Photobucket